Photographing the Tulum Ruins: Best Spots, Timing, and Camera Rules
A photographer's guide to the Tulum ruins — best shooting spots, camera and tripod permit rules, drone laws, and how to get the best light in a compact, crowded site.
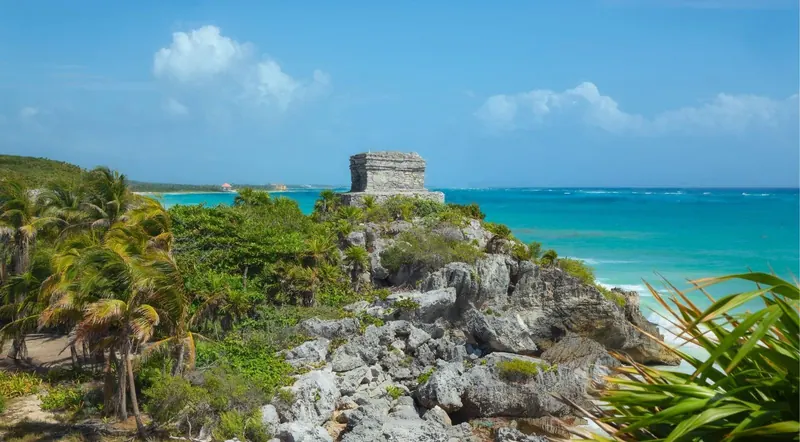
Your phone shoots for free. A GoPro or tripod might cost you a small fee at the gate. A drone will get confiscated. And the postcard shot everyone wants — the Temple of the Wind God against the turquoise Caribbean — is a bottleneck even in the early morning.
Here’s what works, and what the rules say. If you’d rather have a guide walk you to the good frames at an early start, the guided walk below has various start times you can compare by date:
What You Can Shoot, and What It Costs
Phones and standard cameras: free, no questions asked. This covers the overwhelming majority of visitors and needs no permit or fee.
GoPros, action cameras, camcorders and tripods: a small fee applies. Expect somewhere around 45 pesos, cash, paid at the ticket booth, though some current reports put it closer to 60, so confirm the exact figure when you arrive. Whether a standard DSLR or mirrorless camera triggers this fee is inconsistent across reports. Treat it as possible and bring a little extra cash just in case.
Tripods and “professional” gear are a different category entirely. Under Mexico’s federal heritage-site rules, shooting with special or professional equipment, tripods included, technically requires an advance permit from the national anthropology institute, applied for at least ten business days ahead, with a substantial day-rate fee running into the thousands of pesos. In practice, most visitors who show up with a tripod are turned away at the gate. Plan to shoot handheld. For details on the ruins entrance fee itself, see our ticketing guide.
Wedding, proposal and professional photography is a local industry, but it largely happens outside the protected zone. Reputable local photographers steer styled shoots (lighting, assistants, the works) to the public beaches and coastline just beyond the ruins rather than promising access inside, because a professional shoot inside the zone needs that same advance permit. A casual engagement moment captured on your own phone inside the ruins is fine; a hired, equipped shoot is a different proposition.
Other Experiences You Might Enjoy
Tulum is one stop on a coast full of photogenic places. The turquoise pools of the cenotes along the Cobá road, the sea turtles of Akumal, the jungle-wrapped pyramid at Cobá, the Muyil ruins and the lazy-river float through the Sian Ka’an Biosphere Reserve, and the long day inland to Chichén Itzá and colonial Valladolid all make good frames from a Tulum or Riviera Maya base. Current availability and pricing for these and other experiences along this stretch of coast are below.
Drones: Just Don’t
This one’s simple. Drones are prohibited throughout the archaeological zone, full stop, under federal heritage protection law, and the entrance bag check screens for them. Separately, Mexican civil aviation rules make it difficult for a foreign visitor to legally register a drone over 250 grams in the country at all.
Fly one anyway and you risk confiscation on the spot, plus real fines. Mexican authorities have pursued formal sanctions against unauthorized drone photography at Maya sites before, including a well-documented case at Chichén Itzá. There’s no meaningful exception for tourists. Leave it at the hotel.
The Best Photo Spots
The Temple of the Wind God is the shot everyone comes for: a small circular temple perched on a rocky outcrop, framed by the Caribbean behind it. As we cover in our structure-by-structure guide, this is the single most photographed composition at Tulum, for good reason.
Here’s the catch: because the site is so compact, this one vantage point becomes a bottleneck even during the 08:00–09:30 window we recommend elsewhere in this cluster. Go here first, the moment you’re through the gate. Get your clean frames while you can, then work backward through the rest of the site once it fills in.
El Castillo, the main pyramid on the clifftop, is your other essential shot. Strong options include the classic wide composition with the sea behind it, a look up from the beach below when access is open, and tighter frames on the stonework itself. You can’t climb or enter (every structure has been roped off since 1994), so all your angles come from the surrounding paths.
The beach beneath the ruins gives you the reverse angle: the cliff and the ruins seen from below. Access here has shifted on and off in recent years as beach rules around the site have changed, so treat this as a bonus if it’s open on your visit day, not a guarantee.
The walls and gateways are an underused option. Tulum is one of the few walled Maya cities, and the low stone gateways make natural frames. Shoot through one to catch a temple or pyramid beyond it, and you’ll often dodge the crowd in the same shot.
The iguanas deserve their own mention. Black spiny-tailed iguanas bask on the warm stones throughout the site and make a great wildlife-meets-architecture subject. Keep your distance and let a short telephoto or zoom do the work. Early morning, when they’re still and sunning themselves, is your best window.
There’s no blanket photography ban anywhere on site, but the interior murals at the Temple of the Frescoes can’t be approached closely, so keep expectations realistic there, and keep flash off near any carved or painted surface out of basic respect for the stone.
Timing: There’s No Sunrise or Sunset Shot Here
One thing to know before you plan your whole trip around golden hour: as we cover in our best-time-to-visit guide, the site opens at 08:00 and closes by 17:00, which means true sunrise and sunset aren’t visible from inside the walls, on any day of the year.
What you have to work with is the 08:00–09:30 window: soft, lower-angle morning light, and also the coolest stretch of the day. That’s your best achievable light, full stop. A late-afternoon visit before closing gives you warmer light, at the cost of a full day’s heat already banked. Midday, roughly 10:00 to 14:00, is the one window to avoid: harsh overhead sun, blown-out limestone, and the site at its most crowded.
If you’re stuck shooting midday anyway: a polarizing filter cuts the sea glare and deepens the sky more than almost anything else you can do. Expose for the highlights and not the shadows, since the white limestone blows out fast. Bracket your exposures given the contrast between bright sky and shadowed stone. And when the colour goes flat under hard light, converting to black and white often rescues a shot that a colour edit can’t.
Getting Clean Shots on a Small, Crowded Site
Because Tulum is compact, everyone ends up funnelled toward the same two or three vantage points. A few things help:
Go straight to the Temple of the Wind God first, before it fills in. Shoot tight: isolating a structure against sky or sea crops out the crowd around it far more effectively than trying to time a gap. Use the gateways and walls as natural framing to hide foot traffic in the same shot. Shoot from a lower angle so sky fills your background instead of people. And if you have the flexibility, a second pass late in the afternoon, is a good reason to return.
What to Bring
A smartphone, or a standard mirrorless or DSLR body with one versatile zoom lens, covers nearly everything here. A wider lens, roughly 14–24mm equivalent, captures the ruins against the horizon; a short telephoto isolates individual structures and gets you close to the iguanas without disturbing them. A polarizing filter is the single most useful accessory you can carry.
You don’t need a tripod. Daylight is plentiful throughout opening hours for handheld shooting, and bringing one only risks the fee-and-permit issue for no real benefit. Leave it, and the drone, at the hotel.
Coastal conditions are hard on gear. Salt air and humidity are real considerations, so pack lens wipes and a blower, avoid swapping lenses in blowing sand near the cliff edge, and let your camera acclimate when moving between air conditioning and the heat outside to avoid condensation on the glass.
Are Photography Tours Different From Regular Ones?
Mostly, they’re repackaged early-morning private tours. What you’re paying for is a guide who knows the site well enough to route you to the Temple of the Wind God first and point out angles you might miss on your own. That’s useful, but it isn’t a fundamentally different product from a good early tour, and no listing in our inventory is sold as a dedicated photography tour. Two products come closest. The Tulum Archaeological Zone Guided Walking Tour runs 1 hour 15 minutes with a certified guide, has various start times so you can pick the earliest, and adds beach access afterwards; it’s rated 4.9 from 110 reviews, from $17. If you want to set the route and the pace yourself, the private Tulum ruins guide starts at $82 per group, though it rates 4.5 from only 13 reviews, so read those before you commit. Our tour formats guide covers when private pricing beats per-person group pricing.
One claim to treat with the same skepticism we apply elsewhere in this cluster: “before-opening” or “sunrise access” marketing. The gate opens at 08:00 for everyone, no exceptions, and pre-pandemic sunrise access programmes no longer exist. “Early access” in practice means an operator gets you there right at opening and handles your tickets. That’s a real convenience, but it isn’t entry before the public gate opens.
Compare every early-start Tulum ruins tour →
Beyond the Obvious Shot
Tulum is one of the most photographed sites in Mexico, and the Temple of the Wind God and El Castillo postcard shots are, by now, oversaturated on social media. If you want something with a bit more originality, try the gateway-framing approach, a low-angle iguana portrait with a temple softly out of focus behind it, tight detail shots of the carved stonework and the descending-god figures, or a minimalist composition of the wall against open sky. The obvious shot is obvious for a reason, but it deserves one deliberate detour.
Frequently Asked Questions
Do I need a permit to take photos at the Tulum ruins? No, not for a phone or standard camera. A small fee may apply for GoPros, camcorders, or tripods, and professional equipment requires an advance permit.
Is there a camera fee at Tulum, and how much is it? Yes, for certain equipment — roughly 45 pesos, sometimes reported closer to 60. Confirm the exact figure at the booth on arrival.
Can I bring a tripod into the Tulum archaeological zone? Not without an advance permit that most casual visitors won’t have. Plan to shoot handheld.
Are drones allowed at the Tulum ruins? No. They’re banned entirely, screened for at the entrance, and flying one risks confiscation and real fines.
Can I do a professional or proposal photoshoot inside the ruins? Styled professional shoots typically happen on the beaches and coastline outside the protected zone rather than inside it. A casual phone photo of a proposal moment inside the ruins is fine.
What’s the best time of day to photograph the ruins? 08:00 to 09:30 — the softest light, and also the coolest window of the day.
Can I get sunrise or sunset photos inside the ruins? No. The site’s hours don’t line up with either: it opens after sunrise and closes before sunset year-round.
What’s the single best photo spot at Tulum? The Temple of the Wind God, though it’s a crowd bottleneck, so go there first, immediately after the gate opens.
How do I get photos without crowds in them? Arrive right at opening and shoot the Wind God first, use tight framing and gateways to crop out foot traffic, and consider a second pass late in the afternoon.
Do I need a tripod or drone for good photos here? No. A phone or a standard camera with one versatile lens covers this site well; neither a tripod nor a drone adds enough to be worth the hassle.
Plan Your Shoot
Arrive early, go straight for the Wind God, and leave the tripod and drone behind. Check the earliest start times for the guided walk in the calendar above, or browse the full range of Tulum ruins tours before you choose.
Related: The complete Tulum ruins guide · Inside the Tulum archaeological zone · Best time to visit · Private vs. small-group tour formats
Camera and drone rules verified August 2026. Equipment fees and permit requirements can change — confirm current rules at the entrance before your visit. Ratings and review counts re-checked live on 19 September 2026 and will drift as new guests review.
Walk Through 800 Years of Maya History
Join guests who rated this guided walking tour 4.9/5. A certified local guide, skip-the-confusion entry, and beach access afterward — all included. Free cancellation.
Check Availability & Book